Traverse Global v11.2
Warehouse Management System (WMS) Process Examples
These are sample walk-throughs to give you an idea of how WMS can be utilized. These are basic workflows, and are only presented as examples.
Before we go through the samples, create test receiving, working, and packing bins, then assign them to your user as their default bins.
Use the Bins function on the WM Setup and Maintenance menu to create test bins and assign them the bin types of packing, receiving, and working.
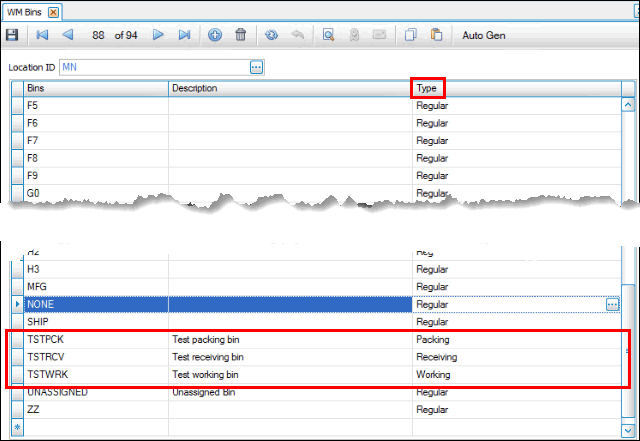
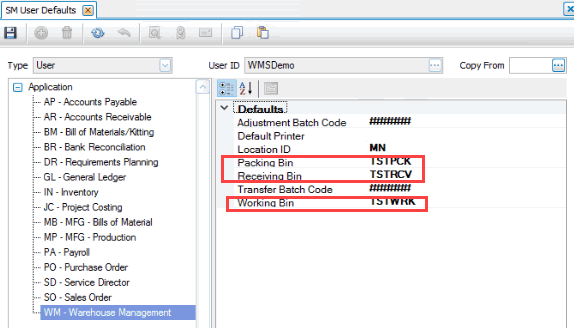
Use the User Defaults function on the SM Company Setup menu to assign default receiving, packing, and working bins.
This example walks through the process of creating a purchase order, receiving the PO, and putting the item into inventory.
Create a new purchase order.
We will utilize an inventory item that is lotted and serialized to demonstrate that part of the process.
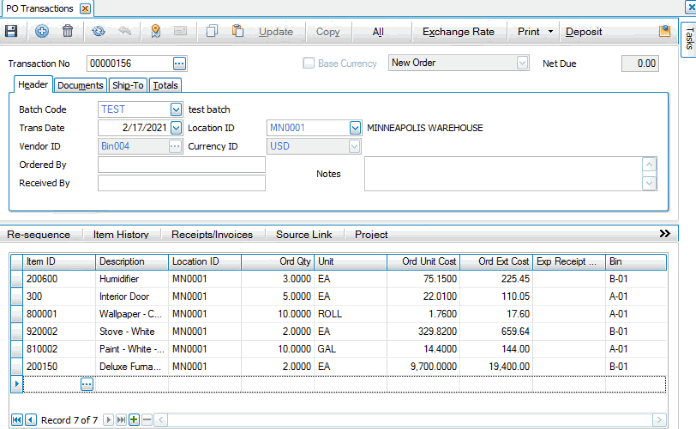
Save the order.
Receive the PO using WMS
Use the Receive function on the WM Daily Work menu to receive the items.
Keep in mind that the Receive function automatically selects the bin assigned to each line item on the PO as the bin into which that line item is received. If you prefer to receive items into a different bin, make sure you edit this option.
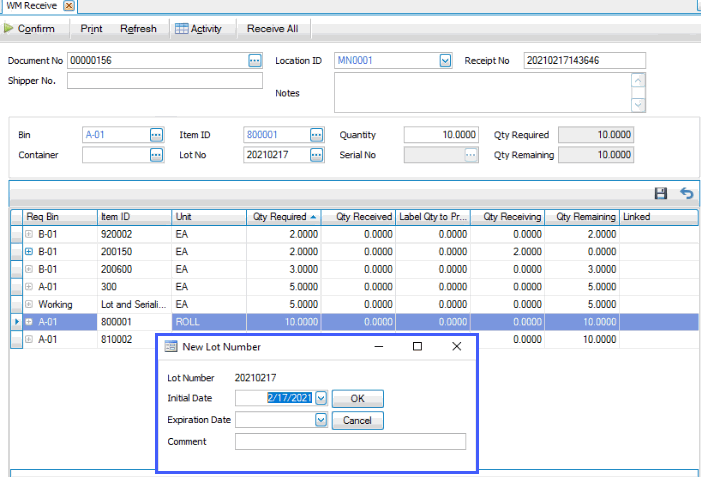
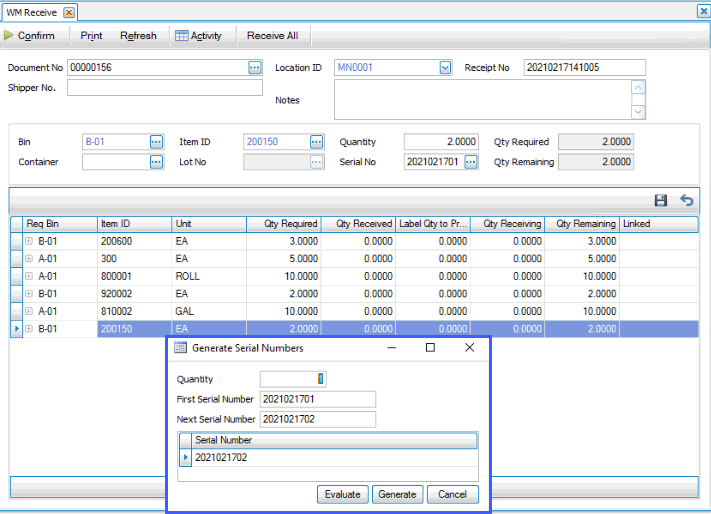
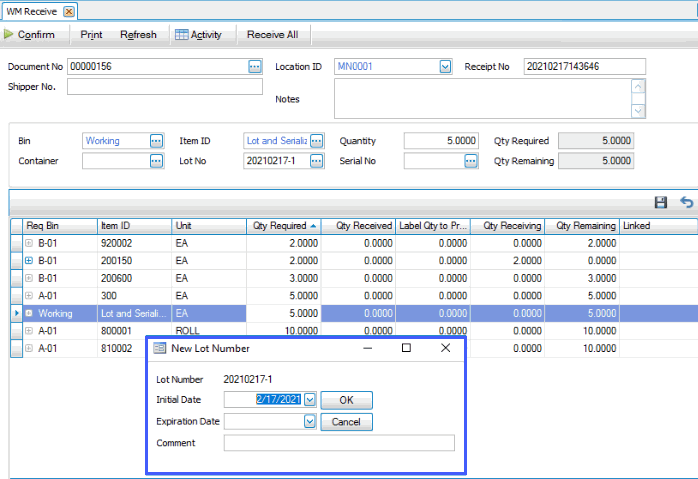
Select the PO in the Document No drop-down list. Use the Receive All button to receive all items on the PO. If you are receiving each item in turn, select the item to receive in the grid, then use the Save button to add the item to the list of items to receive. When receiving each item in turn, a New Lot Number pop-up window, a Generate Serial Number pop-up window, and/or both will appear as needed for the item:
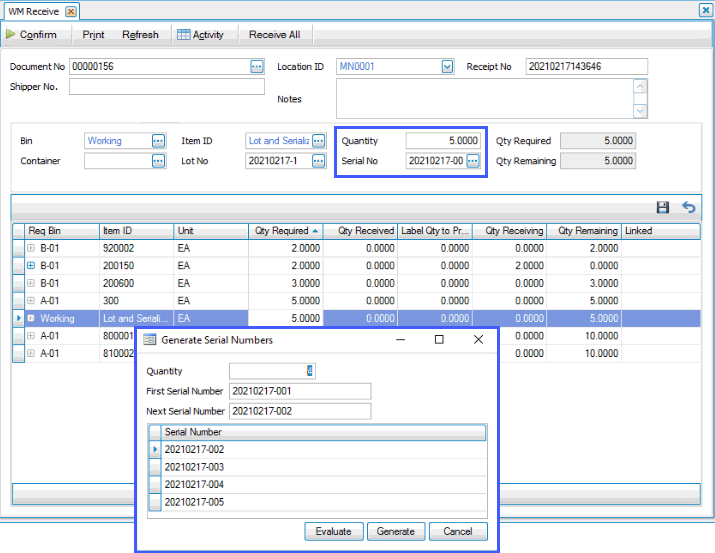
Note that if you receive more than one serialized item at a time, the Generate Serial Number window will appear and allow you to auto-generate serial numbers. Tip: If you use 'Receive All', you will have to enter the serial numbers manually.
When you enter a Lot No, the New Lot Number window pops up. Enter or edit the information, then click OK.
Enter a serial number in the Serial No field. If you are receiving a quantity greater than 1, when you Save the record, the Generate Serial Number window will pop up and allow you to automatically generate serial numbers for the items. Evaluate the serial numbers that will be generated. Once the numbers are acceptable, click Generate.
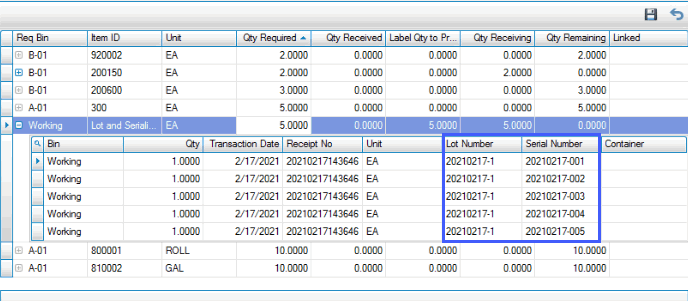
When you have finished receiving items, click Confirm. A dialog box will appear with a check box for Receive and Putaway Together.

If you mark the Receive and Putaway Together check box, the items you are receiving will be put directly into stock, in the bins specified on the Receive screen, and be available for use. If you clear the check box, the items you are receiving will be moved into the specified bins. You will then use the Put Away function to put the items into stock. Click OK to proceed with the confirmation process.
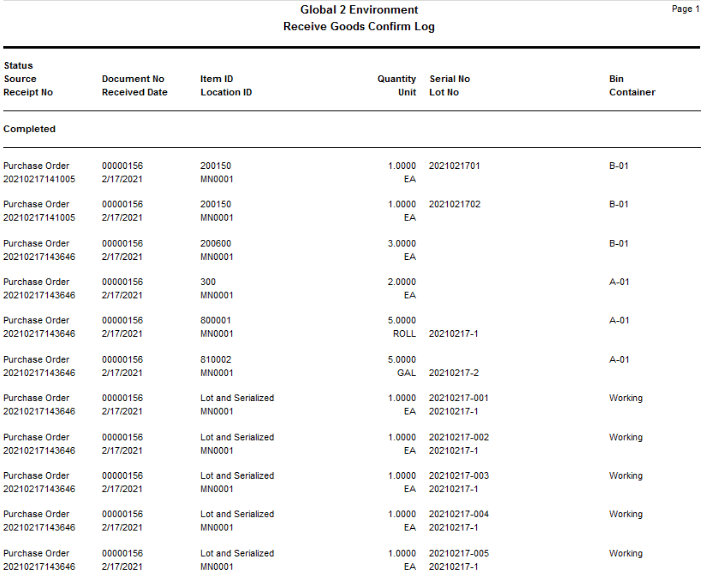
You will receive a notification that the 'Confirm' process completed successfully. The Receive Goods Confirm Log will display. Notice the bin in which the items are located.
After the confirm process, if you left the Receive and Putaway Together check box blank, use the Put Away function to put the items into stock.
The receipt now appears on the PO Receiving Report.
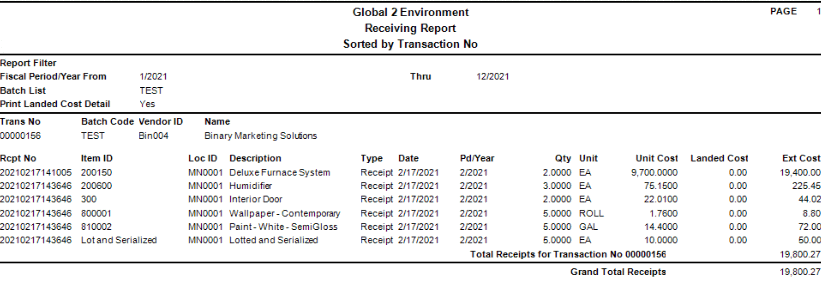
The purchase order status is now 'Goods Received'.
Put into inventory
Note: The Receive and Putaway Together business rule must be set to 'No' in order to use this function. If the Receive and Putaway Together business rule is set to 'Yes', you cannot use the Put Away function to 'see' any items that may be in receiving bins. In this case, use the Move function to relocate items from the receiving bin into stocking bins.
If you do not change the Bin during the receiving process, items are automatically received into your default receiving bin. Use the Put Away function on the WM Daily Work menu to put the items in the receiving bin into inventory stocking bins.
When you open the Put Away function, you will see a list of all the items that are in the receiving bin to be put away into stock.
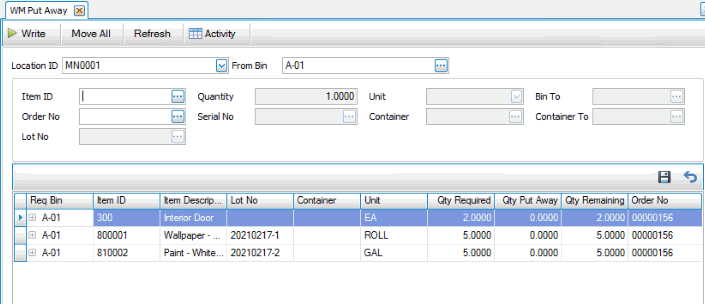
You can move each item into a bin or bin/container all at once by using the Move All button on the toolbar. This will move all items into the bin and, if applicable, container you indicate. If you want to put items into different bins, then put each item away in turn by clicking on the item in the grid. Note: You will have to put away each serialized item separately when you use this method.
For each item, select the record in the grid to fill the fields. Accept or edit the quantity you are putting away. Select a Bin To, Lot No and/or Serial No as applicable, and a Container To, as needed. Save your entries. Continue until you have put away all items. Once you have finished designating destination bins for all items, click Write.
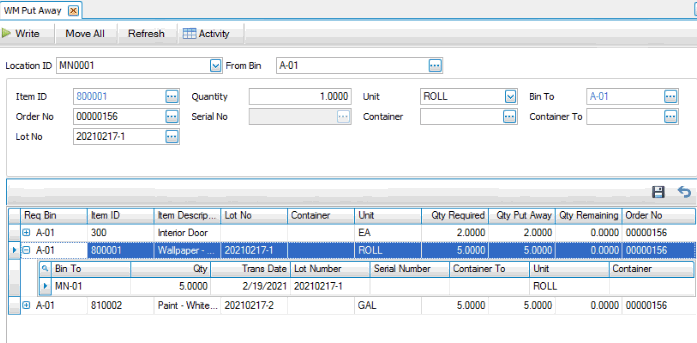
Once you write the put away list, use the Activity View to review the put-away inventory movements.
Complete the purchase order process using your standard procedure.
This example walks through the process of creating a sales order and packing the SO.
Create a new sales order.
We will utilize inventory items that are lotted and items that are serialized to demonstrate that part of the process.
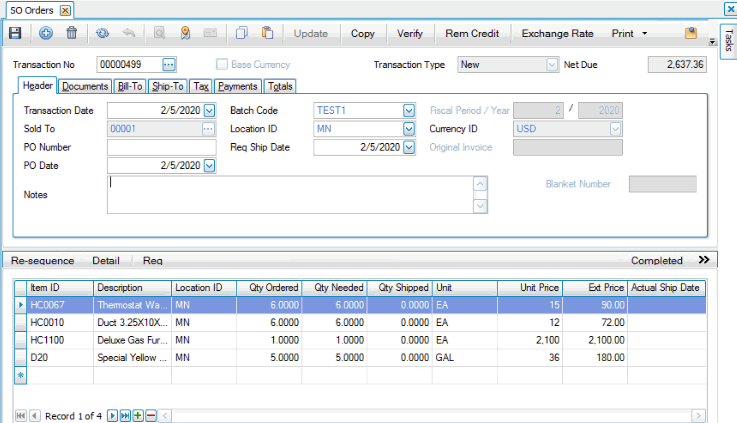
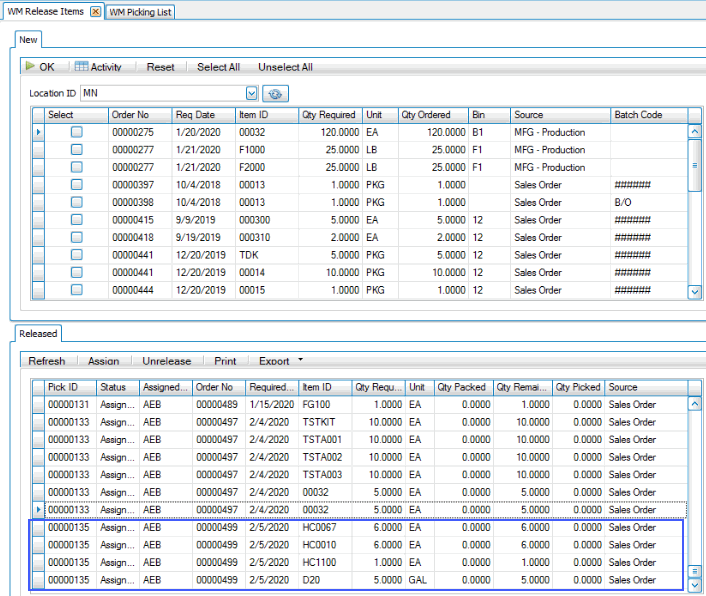
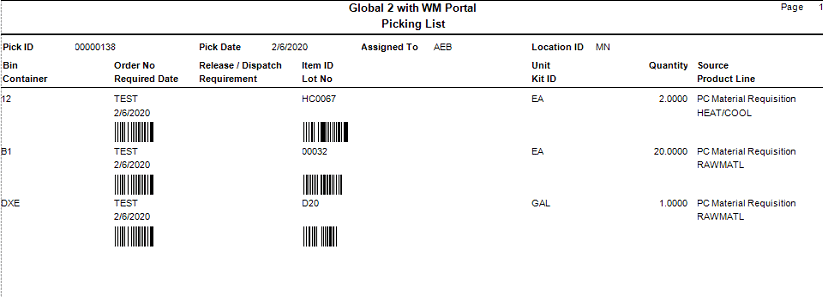
Next, create a picking list for the order using the Picking List function on the WM Daily Work menu. Use the Release button on the SO Orders screen, or use the Release Items function on the WM Daily Work menu. Releasing the items creates a pick ID you will use to print a picking list.
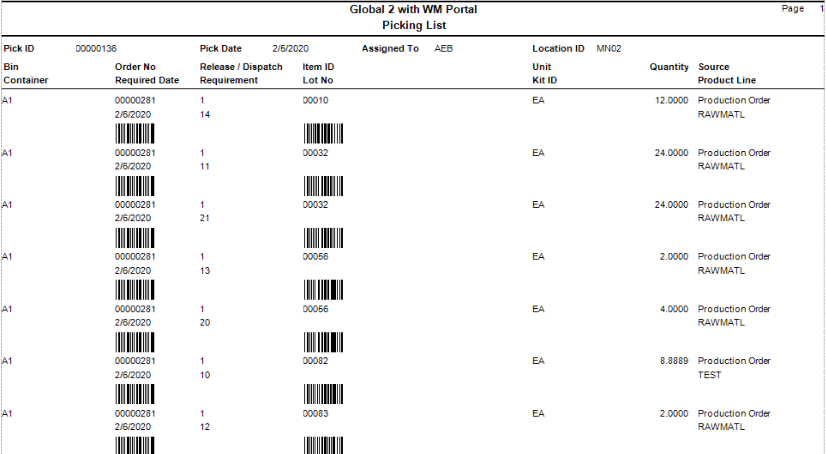
Create a picking list for the items using the Picking List function on the WM Daily Work menu.
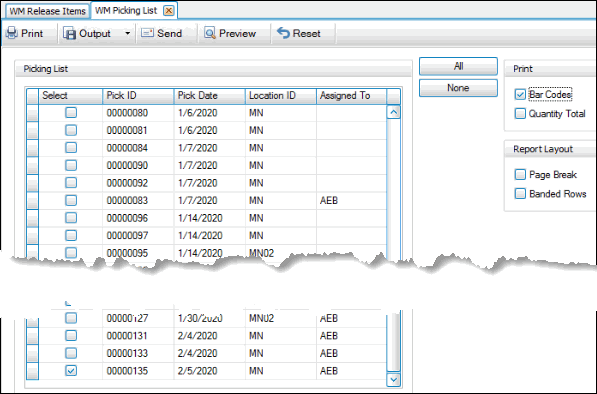
Pick items for sales order
Pick the items for the sales order using the Pick function on the WM Daily Work menu. Select the item(s) to pick, enter the quantity, and select a Lot No and/or Serial No as required. Make sure to Save between each item you pick.
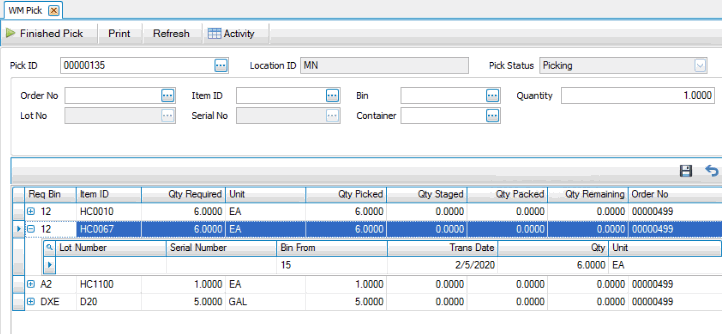
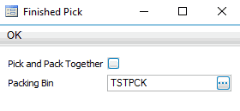
Click Finished Pick to complete the picking process. The Finished Pick dialog box will appear. The Pick and Pack Together check box will be marked or clear depending on the WM business rule for Pick and Pack Together setting. To finish the pick and move the items directly to the packing process, mark the check box. To finish the pick process, then perform the pack process as a separate step, leave the check box clear. See the Pick topic for more information.
 WWWWW
WWWWW
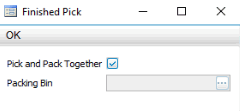
For this example, we will clear the Pick and Pack Together check box and accept the default packing bin. Click OK to proceed.
A notification box will display when the confirm process is completed. The items on the order are now located in the default packing bin.
NOTE: If you mark the Pick and Pack Together check box, the sales order will be ready to verify after you confirm the pick. Finish the sales order process using your standard procedures.
Pack Orders
Because we left the Pick and Pack Together check box blank, we have to pack the order in a separate step from the picking process. Use the Pack Orders function on the WM Daily Work menu to pack the items for the order.
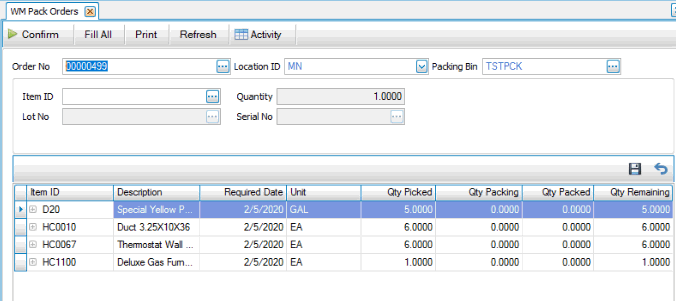
Select each line item, verify the quantity and lot and/or serial numbers, and click Save to pack the item. Alternately, to pack all items at once, use the Fill All button. Click Confirm to finalize the packing process.
A notification box will display when the confirm process is completed. The sales order is ready to be verified. Finish the sales order process using your standard procedures.
This example walks through the process of receiving finished goods from a manufacturing production order and putting them into inventory.
Create a new production order.
Release the order.
Next, create a picking list for the order using the Picking List function on the WM Daily Work menu. Use the Release Items function on the WM Daily Work menu.
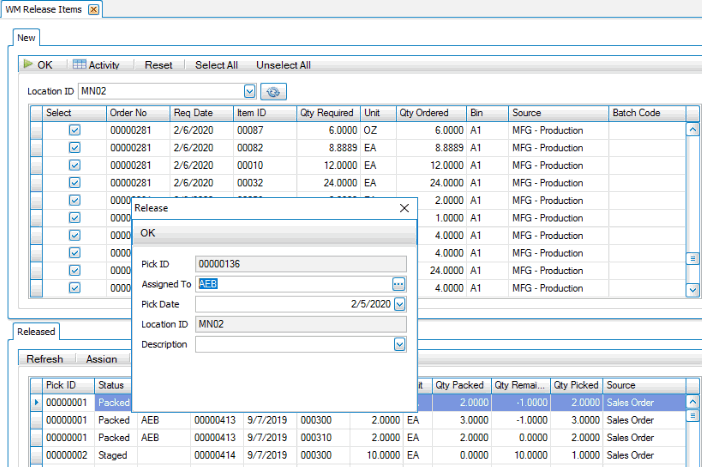
Releasing the items creates a pick ID you will use to print a picking list.
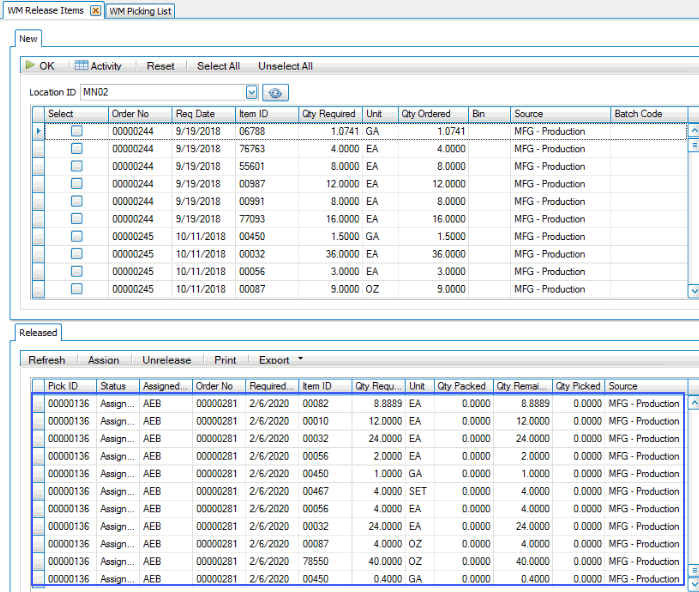
Pick items for production order
Pick the items for the production order using the Pick function on the WM Daily Work menu. Select the item(s) to pick, enter the quantity, and select a Lot No and/or Serial No as required. Make sure to Save between each item you pick. Be aware that the default bin from which the items are picked may not be the bin in which the items are stocked at the time you pick them.
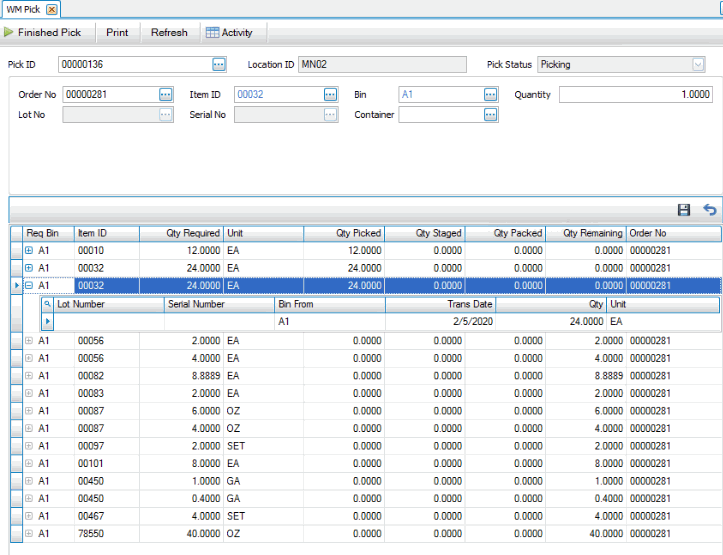
If you need to unpick an item, right-click on the child item and delete. Note: This will not uncommit the item.
Click Finished Pick to complete the picking process. The Finished Pick dialog box will appear. The Pick and Pack Together check box will be marked or clear depending on the WM business rule for Pick and Pack Together Default setting. To finish the pick and move the items directly to the packing/production process, mark the check box. To finish the pick process, then perform the pack process as a separate step, leave the check box clear. See the Pick topic for more information.
 WWWWW
WWWWW

For this example, we will mark the Pick and Pack Together check box. Click OK to proceed. Traverse will move the quantities to the default packing bin for the user at the location.
A notification box will display when the confirm process is completed.
Pack (issue) orders
Because we marked the Pick and Pack Together check box, the packing/moving process is performed with the picking process. If you left the check box blank, you must use the Pack Orders function on the WM Daily Work menu to pack/issue the items for the order.
Select the order, location, and bin for the items you picked. The list of items you picked will display.
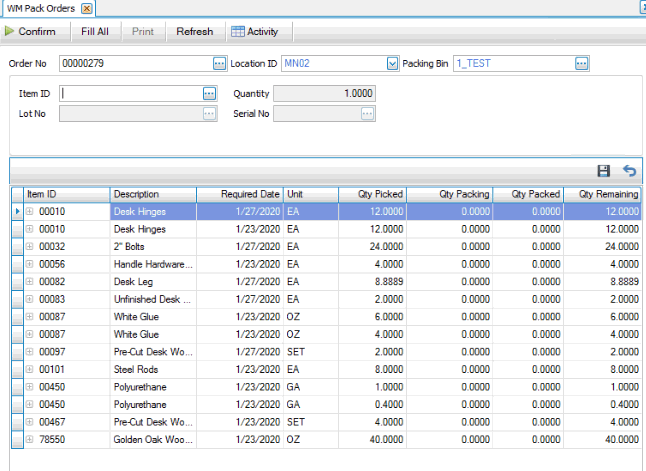
Use the Fill All button to pack/issue all items to the order.
Click Confirm to finish the process. A notification box will display when the confirm process is completed.
The items you confirmed will appear on the production order.
Once you confirm the picked items to the production order, they will appear on the order when you use the Record Production Activity function to add labor and other costs to the order.
Receive finished goods into inventory
Use the WM Receive function on the WM Daily Work menu to receive the finished goods into inventory.
Open the Receive function and select the production order. The finished goods items will appear in the grid. Remember, you can add columns to the grid using the Column Chooser.
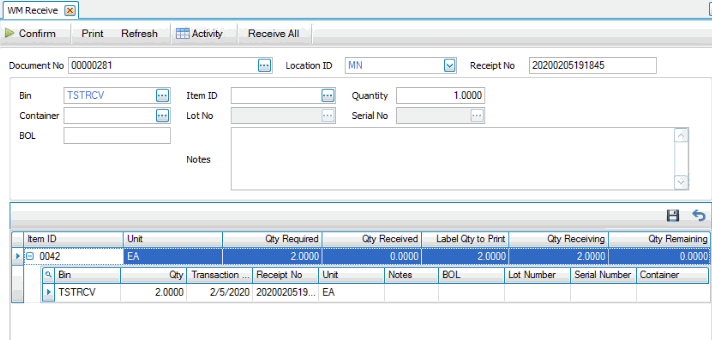
Select an item to receive, then click Save. Alternately, use the Receive All button on the toolbar to receive all items at once. Notice the bin is the default receiving bin. To move the items into an inventory stocking bin, you must use the Put Away function.
When you have finished receiving items, click Confirm. A dialog box will appear with a check box for Receive and Putaway Together.

If you mark the Receive and Putaway Together check box, the items you are receiving will be put directly into stock, in the bins specified on the Receive screen, and be available for use. If you clear the check box, the items you are receiving will be moved into the specified bins. You will then use the Put Away function to put the items into stock. Click OK to proceed with the confirmation process.
A notification box will display when the confirm process is completed. The items you confirmed will appear on the production order.
Complete the production process using your standard procedures.
Put item into stock
We put the items into inventory where they can be picked when needed. Use the Put Away function on the WM Daily Work menu to put the items into inventory stocking bins. The Put Away function is a version of the Move function, and allows you to move items that are located in a bin.
When you receive items from a purchase order, RMA, or production order, the default receiving bin is selected as the destination bin. If you do not change that destination Bin during the receiving process, items are automatically received into a receiving bin. Use the Put Away function on the WM Daily Work menu to put the items in the receiving bin into inventory stocking bins.
When you open the Put Away function, you will see a list of all the items that are in the selected receiving bin.
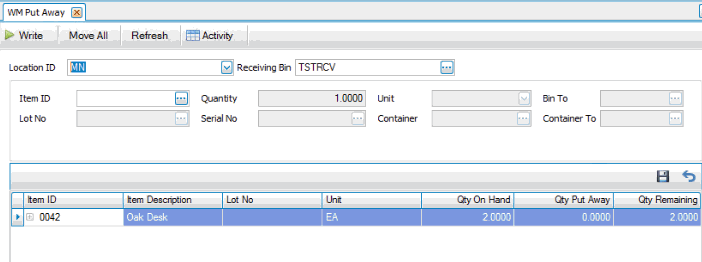
You can move each item into a container and/or bin all at once by using the Move All button on the toolbar. This will move all items into the bin and, if applicable, container you indicate. If you want to put items into different bins, then put each item away in turn by clicking on the item in the grid. Note: You will have to put away each serialized item separately when you use this method.
For each item, select the record in the grid to fill the fields. Accept or edit the quantity you are putting away. Select a Bin To, Lot No and/or Serial No as applicable, and a Container To, as needed. Save your entries. Continue until you have put away all items. Once you have finished designating destination bins for all items, click Write.
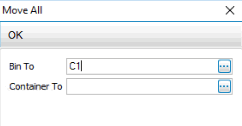
Because we do not have a serialized or lotted item, we will use the Move All button on the toolbar. The Move All window will pop up. Select a destination bin and container, as needed.
Once you write the put away list, the items are available in inventory. Use the Activity View to review the put-away inventory movements.
This example walks through the process of picking inventory items for work orders.
Create a new work order.
Next, use the Release Items function on the WM Daily Work menu to release parts for the work order, then create a picking list for the order using the Picking List function on the WM Daily Work menu.
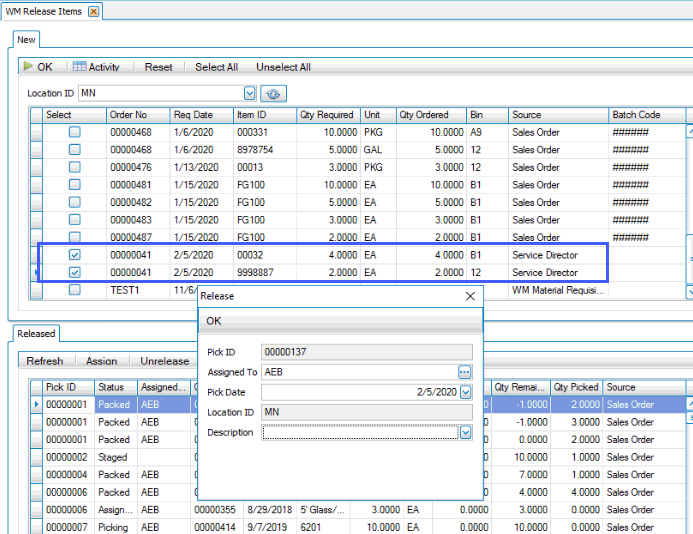
Releasing the items creates a pick ID you will use to print a picking list.
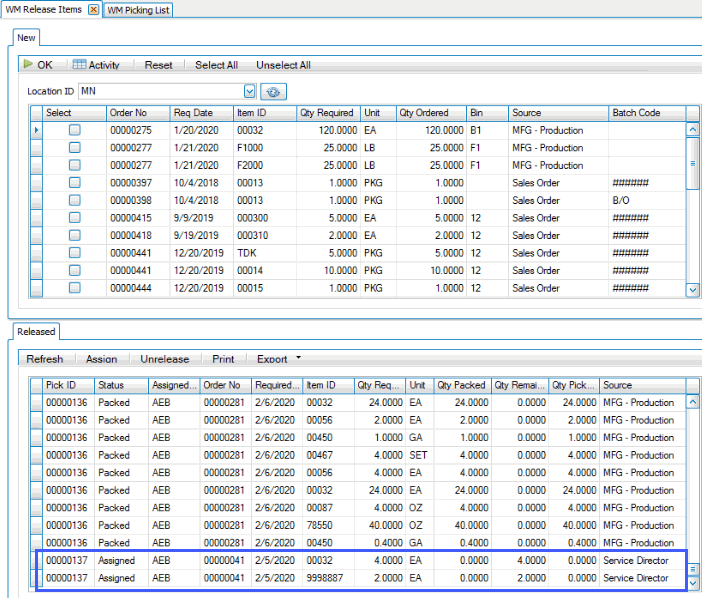
Pick items for work order
Pick the items for the work order using the Pick function on the WM Daily Work menu. Select the item(s) to pick, enter the quantity, and select a Lot No and/or Serial No as required. Make sure to Save between each item you pick.
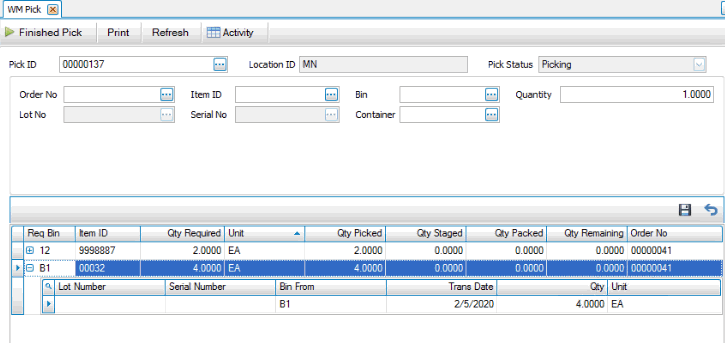
If you need to unpick an item, right-click on the child record and select delete. Save.
Click Finished Pick to complete the picking process. The Finished Pick dialog box will appear. The Pick and Pack Together check box will be marked or clear depending on the WM business rule for Pick and Pack Together Default setting. To finish the pick and move the items directly to the packing/production process, mark the check box. To finish the pick process, then perform the pack process as a separate step, leave the check box clear. See the Pick topic for more information.
 WWWWW
WWWWW

For this example, we will mark the Pick and Pack Together check box. Click OK to proceed. Traverse will move the quantities to the default packing bin for the user at the location.
A notification box will display when the confirm process is completed.
Pack (issue) orders
If you leave the Pick and Pack Together check box blank, the packing/moving process is performed with the picking process. Use the Pack Orders function on the WM Daily Work menu to pack/issue the items for the order.
Select the order, location, and bin for the items you picked. The list of items you picked will display.
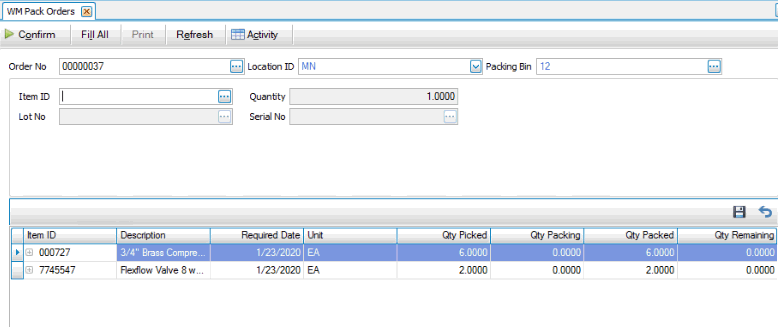
Use the Fill All button to pack/issue all items to the order.
Click Confirm to finish the process. A notification box will display when the confirm process is completed.
The items you confirmed will appear on the work order on the Transactions tab.
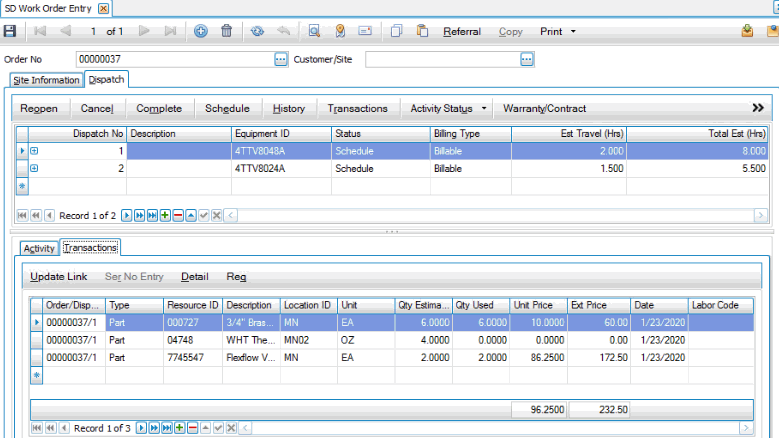
Continue the work order process using your standard procedures.
This example walks through the process of creating a material requisition for a project, receiving the item(s), and issuing the item to the project.
Create a new project.
Add material estimates to the project. Generate a transaction (requisition or purchase order) for each material estimate or material transaction you added.
Use the Release Items function on the WM Daily Work menu, then create a picking list for the order using the Picking List function on the WM Daily Work menu.
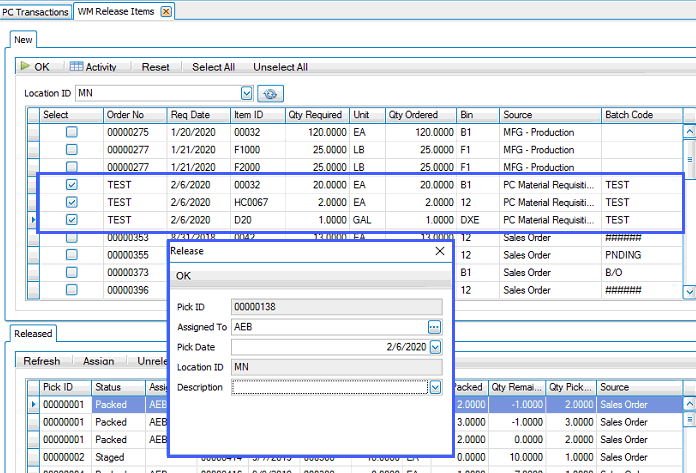
Releasing the items creates a pick ID you will use to print a picking list.
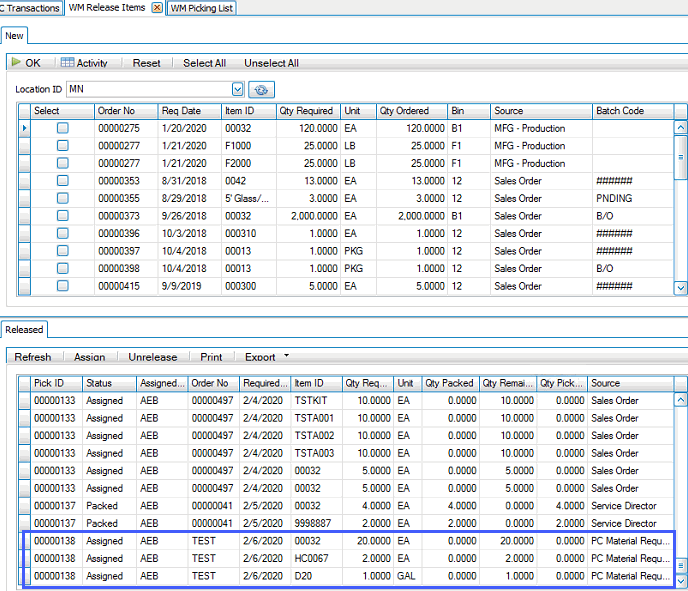
Pick items for the project
Pick the items for the project using the Pick function on the WM Daily Work menu. Select the item(s) to pick, enter the quantity, and select a Lot No and/or Serial No as required. Make sure to Save between each item you pick.
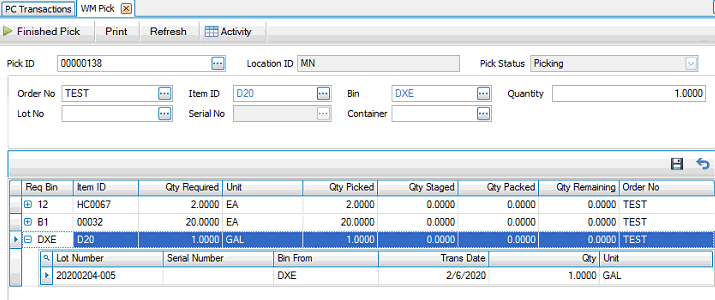
If you need to unpick an item, right-click on the child item and delete.
Click Finished Pick to complete the picking process. The Finished Pick dialog box will appear. The Pick and Pack Together check box will be marked or clear depending on the WM business rule for Pick and Pack Together Default setting. To finish the pick and move the items directly to the packing/production process, mark the check box. To finish the pick process, then perform the pack process as a separate step, leave the check box clear. See the Pick topic for more information.
 WWWWW
WWWWW

For this example, we will mark the Pick and Pack Together check box.If Click OK to proceed. Traverse will move the quantities to the default packing bin for the user at the location.
A notification box will display when the confirm process is completed.
Complete the project costing process using your standard procedure.
Pack (issue) orders
If you leave the Pick and Pack Together check box clear, the packing/moving process is performed separate from the picking process. Use the Pack Orders function on the WM Daily Work menu to pack/issue the items for the order.
Select the order, location, and bin for the items you picked. The list of items you picked will display.

Use the Fill All button to pack/issue all items to the order.
Click Confirm to finish the process. A notification box will display when the confirm process is completed.
Complete the project costing process using your standard procedure.
This example walks through the process of transferring an item from a source inventory location to another by sending from one location and receiving to inventory in a destination location. The receiving and stocking processes will be performed using WMS.
Create a new location transfer
Use the Location Transfers function on the WM Daily Work menu to create a new location transfer.
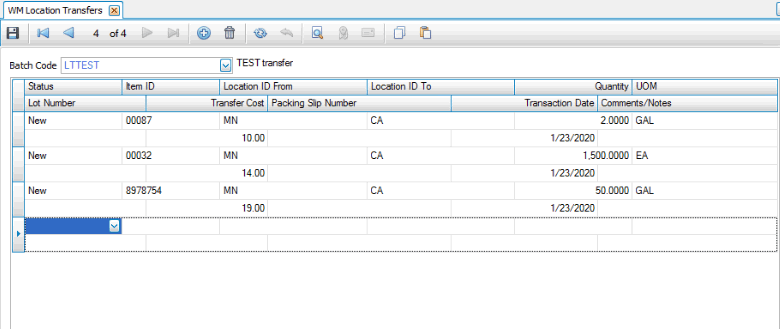
Save the transfer.
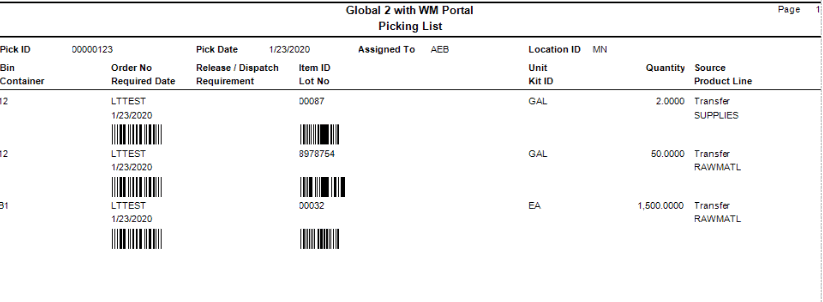
Next, create a picking list for the transfer using the Picking List function on the WM Daily Work menu. First release the item(s) by using the Release Items function on the WM Daily Work menu.
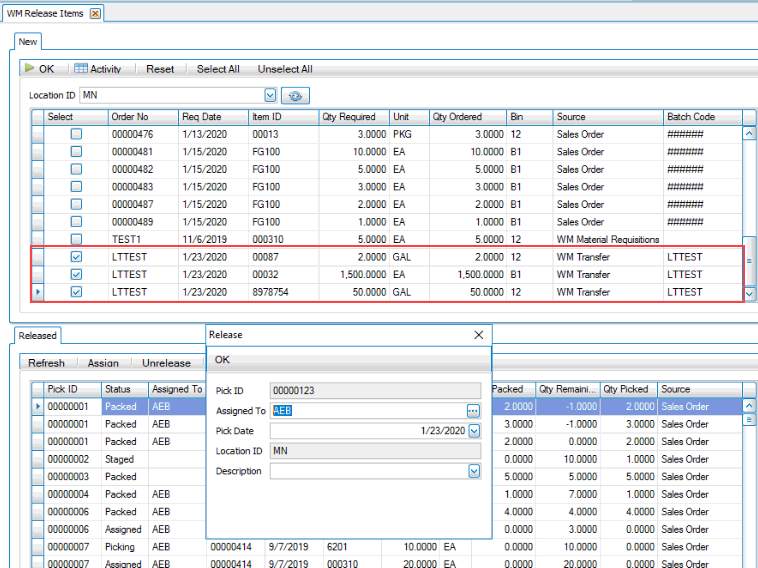
Releasing the items creates a pick ID you will use to print a picking list.
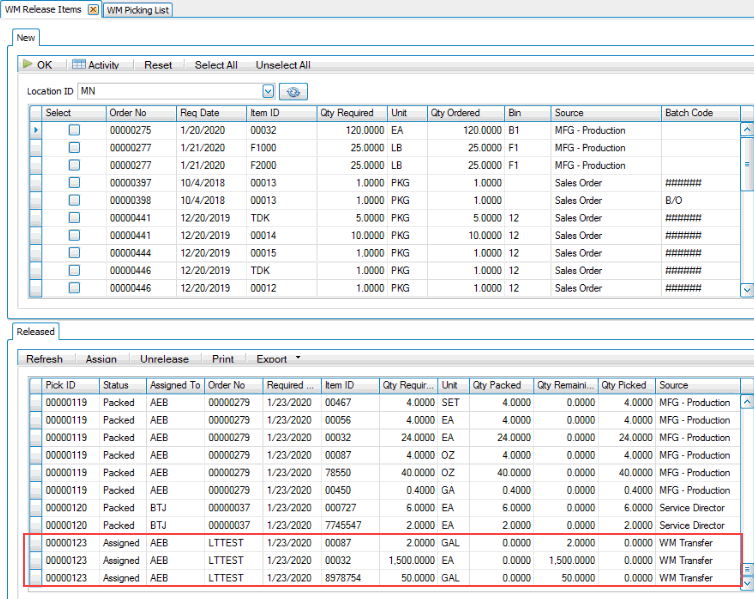
Pick items to transfer
Pick the items to transfer using the Pick function on the WM Daily Work menu. Select the item(s) to pick, enter the quantity, and select a Lot No and/or Serial No as required. Make sure to Save between each item you pick.
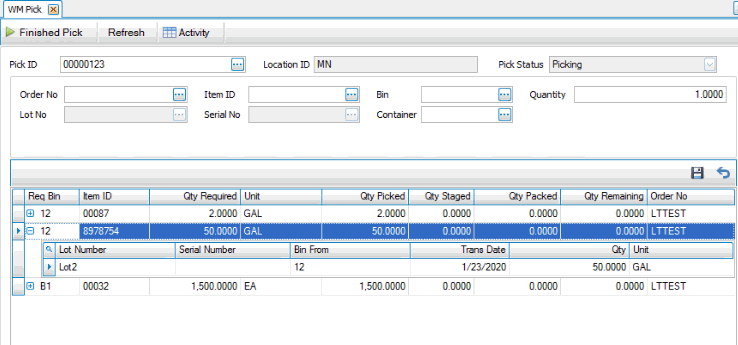
Click Finished Pick to complete the picking process. The Finished Pick dialog box will appear. The Pick and Pack Together check box will be marked or clear depending on the WM business rule for Pick and Pack Together Default setting. To finish the pick and move the items directly to the packing/production process, mark the check box. To finish the pick process, then perform the pack process as a separate step, leave the check box clear. See the Pick topic for more information.
WWWWW

For this example, we will mark the Pick and Pack Together check box. Click OK to proceed. Traverse will move the quantities to the default packing bin for the user at the location.
A notification box will display when the confirm process is completed.
Receive the transfer
Use the Receive function on the WM Daily Work menu to receive the items.
Select the transfer batch in the Document No drop-down list. Use the Receive All button to receive all items for the transfer.
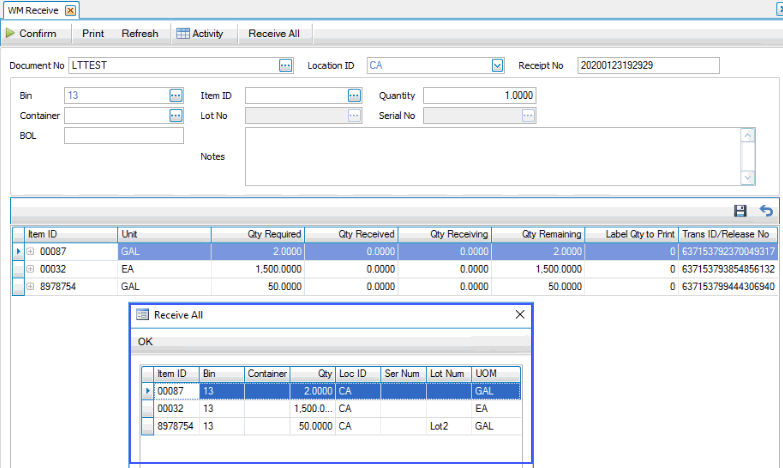
Click OK. A dialog box will appear and ask if you want the default number of labels to the received quantity. Select 'Yes' or 'No'. You will return to the Receive screen. You can expand the line item to see details of the receipt.
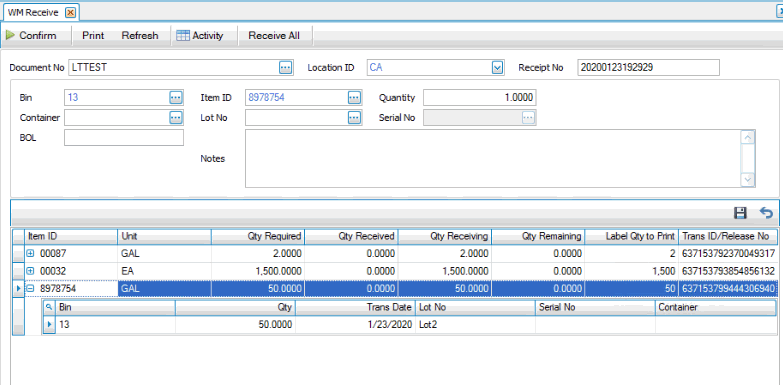
When you have finished receiving items, click Confirm. A dialog box will appear with a check box for Receive and Putaway Together.

If you mark the Receive and Putaway Together check box, the items you are receiving will be put directly into stock, in the bins specified on the Receive screen, and be available for use. If you clear the check box, the items you are receiving will be moved into the specified bins. You will then use the Put Away function to put the items into stock. Click OK to proceed with the confirmation process.
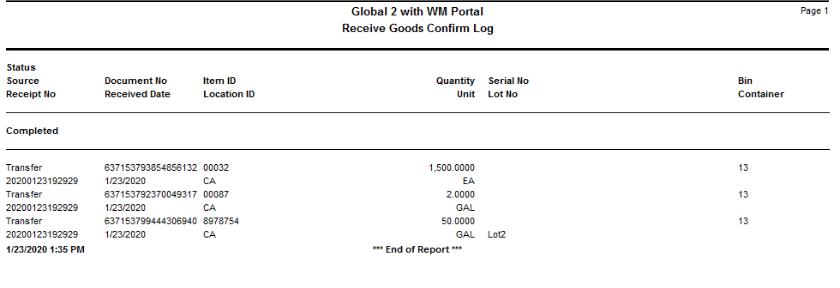
You will receive a notification that the 'Confirm' process completed successfully. The Receive Goods Confirm Log will display.
The receipt appears on the Location Transfers Report.
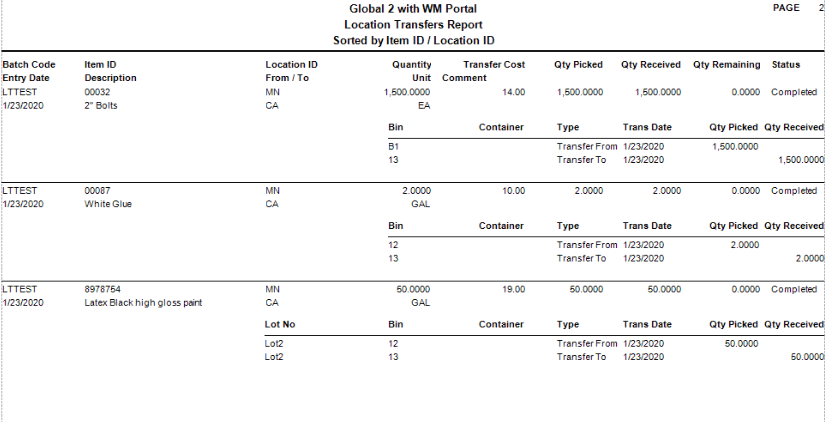
Print the Location Transfers Journal using the function on the WM Reports and Worksheets menu.
Post the location transfers using the Post Location Transfers function on the WM Reports and Worksheets menu.
The physical inventory process is performed in the same manner through Warehouse Management as it is through Inventory.
Before you take a physical inventory, run the IN Item Quantity View so you have a current list of items and quantities for each bin to help you decide what to count in each batch.
Use the WM Physical Inventory functions to take a physical inventory by performing the following steps:
- Post transactions in all modules to update current on-hand quantities.
- Use the Freeze Quantities function to prepare batch codes that include the items and locations you are going to count.
- Select the location and bins to count.
- Click the Prepare button.
- After you prepare batch codes to freeze on-hand quantities, use the Freeze button when you are ready to conduct the physical count.
Once you freeze quantities, there should be no activity in the warehouse until you update the physical inventory using the Update Perpetual Inventory function, but you can continue to process transactions during this time.
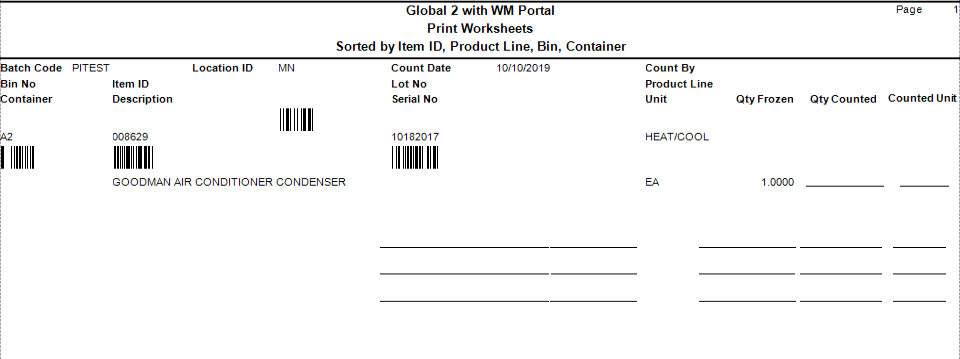
- Use the Print Worksheets function to produce worksheets to record the physical count of your inventory.
- Conduct the physical count using the worksheets.
- Use the Physical Counts Entry function to enter the physical count quantities recorded on your worksheets.
If you have used a bar code scanner to enter your counts into a text (comma delimited) file and have set up a physical counts import definition using the Traverse Integration Engine, select Import on the Physical Counts Entry screen to get your counts imported into your batches.
- Use the Physical Counts View to see the difference between the counts you entered and the frozen quantities in the system. This report is part of your audit trail and must be printed to a file or the printer in order to run the Update Perpetual Inventory function for a batch.
- Select the Update Perpetual Inventory function to update on-hand quantities with the physical count quantities for the items in each batch. Save the log printed during the Update Perpetual Inventory as part of your audit trail for the physical inventory.
Use the Move Quantities function to move items in the same IN location from one bin to another. The bins can be in the same container or different containers, as applicable to your warehouse.
Use the Add button on the toolbar to add records to the move list. You can move individual items or entire containers.
Select the item or container you want to move, choose the inventory location of the item or container, and select the lot and/or serial number as required.

Write the list to complete the move process.
